
What are On-site Data Imports?
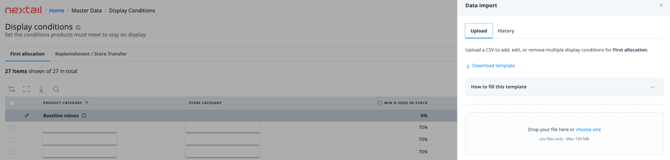
On-site Data Imports let you make bulk updates directly inside each module, without going to a separate upload page. A Data Import button opens a side panel where you download the template, read the field instructions and upload your CSV file.
Imports are processed in 1–2 seconds and are never queued behind other uploads. The legacy Data Upload flow took 7–8 minutes per file, plus waiting time when other imports were running.
⚠️ Since 05-11-2026, the legacy Data Upload page is no longer available for the modules below.
Where to find the Data Import button
The Data Import button sits in the header of each module's screen.
|
Module |
Where to find Data Import |
Import types available |
|
Display Conditions |
"Master Data → Display Conditions" |
Display Conditions |
|
Minimum Displays (MDQ) |
"Master Data → Minimum Displays" |
Minimum Displays (now also accepts sku_ref) |
|
Picking Schedules |
"Master Data → Picking Schedules" |
Picking Schedules |
|
Layouts (Assortment Management) |
"Master Data → Visual Merchandiser" |
One unified Layouts template, with a Module selector: First Allocation / Replenishment & Store Transfer / Transversal |
|
Thresholds (Service Level) |
"Master Data → Products" (Sales Threshold) and "Master Data → Sales Threshold by Warehouse" (Sales Threshold by Warehouse) screen |
Sales Threshold; Sales Threshold by Warehouse |
|
Planning Horizons |
"Master Data → Planning Horizons" |
Planning Horizon Baselines; Planning Horizon Exceptions (choose from a dropdown) |
|
Network Constraints |
"Master Data → Network Constraints" |
Max Store Capacity by Product Category |
How to import data
- Open the module you want to update and click Data Import. A side panel opens.
- If the module has more than one import type (for example Planning Horizons or Layouts), select the one you need.
- Click to download the template. The panel also shows field-by-field instructions: column names, accepted formats and allowed values.
- Fill in the template. You can create, edit or delete several records in one file. Save it as CSV; other formats are not accepted.
- Drag and drop the CSV into the panel or click to select it from your computer.
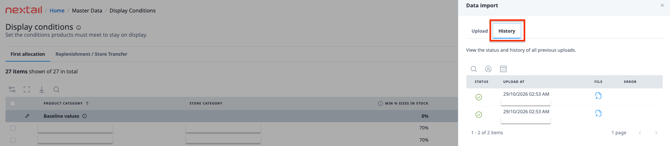
- The import is processed within seconds. Check the result in the panel, or open the Import History tab.

Import History
The Import History tab, inside the Data Import panel, lists every import made through the new panel. For each import you can see:
- The uploaded file and when it was uploaded
- The execution status
- Any errors found
- The user who uploaded it
You can filter the list by date range and by user (you can select several users).
Note: Import History starts from the first import made through the new panel. Uploads made through the legacy Data Upload page are not migrated. The available history period may vary depending on your product plan.
FAQ
Can I still use the Data Upload page? Not for the modules in this article: since 05-11-2026 they can only be updated with Data Import. Other data types (for example Promotions or Pending Orders) are still uploaded through Daily Data → Data Upload. See Data Import templates for the full list.
Which file formats are accepted? CSV only. If you work in Excel, save the file as CSV before uploading.
Can I reuse my old Data Upload templates? We recommend downloading the new template from the Data Import panel. Some column names have changed, and the four Layout templates are now a single template.
Where can I see my old uploads? Imports made through the legacy Data Upload page do not appear in Import History.
Can I delete records with Data Import? Yes. The templates let you create, edit and delete records. Follow the field instructions in the panel for each module.
My import failed. What should I do? Open the Import History tab and check the errors for that import. Fix the file and upload it again.
Can I edit records one by one instead? In most modules, yes. For example, Sales Threshold can also be edited on the Products screen with Change sales threshold. Sales Threshold by Warehouse can only be updated in bulk through Data Import.
Need help?
If you have any questions about On-site Data Imports, contact your Nextail account manager or see How can I request help?
